This will be an in-depth and hopefully complete tutorial on how to use Compute Canada in the most efficient and productive way possible for your deep learning experiments!
Please send me a message if there is anything you would like me to add, or correct.
1. Introduction
If you are here, there is a good chance you are a researcher working at a Canadian institution and your research involves performing deep learning experiments. You may have heard about Compute Canada (CC) - which is a nationwide infrastructure for high performance computing (HPC) - and how it can help you make your deep learning experiments faster or use more memory, and especially make use of multiple GPUs to store more images/videos/tensors. This is all true, and I hope by the end of this tutorial you will know exactly how to do this! I will start from the most fundamental concepts, including setting up your environment, and work towards the goal of deploying multi-gpu training, validation, and inference jobs as well as interactive notebooks for all your deep learning needs! We will also cover monitoring your remote job while it runs on Compute Canada.
I will assume that you will be using Python 3.x for deep learning, as this is the most common programming language for deep learning in academia. You will notice that my examples might use libraries specific to my code, such as Scikit-learn or PyTorch, however these are not necessary for you to use in your own projects (unless I state specifically for a given example).
A note on using the terminal: Many engineering and science trainees do not have much prior experience in using a terminal or ‘command-line’ when interacting with file structures or programs. I strongly recommend following the approach in this tutorial, which makes use of the terminal, wherever possible. To a beginner, it may not be obvious why using the terminal is helpful and it may even seem to obfuscate and confuse simple steps (for example why use cd directory and mkdir new-directory if you can just use Windows Explorer to do the same thing?) - however the long-term benefits of using the terminal strongly outweigh the learning-curve: you will be much more efficient and be able to automate tasks on your computer with ease and this will increase your productivity significantly.
1.1. Table of Contents
Here is a table of contents for quick navigation:
- 1. Introduction
- 2. Terminology
- 3. Setting up your environment
- 4. Transferring files between your PC and Compute Canada
- 5. Submitting Jobs on Compute Canada
- 6. Monitoring your Learning Scripts
- 7. Putting it Together - Video Demos
2. Terminology
Throughout this tutorial I will use terms which you may not be familiar with if you have not previously used the shell/terminal, or if you have not used cloud computing or remote machines. This section provides a brief explanation of these terms
- Local: This refers to anything that you own or have in your personal computer or file structure that is not on Compute Canada or any other computer outside of your personal network (whatever is inside your own home). For instance, your local machine is your personal MacBook, ThinkPad, etc that you use for your personal work, entertainment, etc. A local file is a file stored on your personal computer.
- Remote: This refers to anything that is on a network or machine outside your personal network. In this tutorial this will mostly refer to the ‘remote machine’ or ‘remote server’, which refers to the specific node you are using on Compute Canada. In general it refers to the compute infrastructure that you are accessing using the internet.
- Cluster: Compute Canada offers several clusters. A cluster is a collection of computers that shares some properties, such as the location of the cluster. The computers within a cluster are usually interconnected and will have the same file structure so you can access all your files on any computer within a cluster. A node is another term for a computer within a cluster. In this tutorial we will be using the Cedar cluster on Compute Canada, as it has many nodes with high memory GPUs which are suited for deep learning.
- Node: A node refers to a computer within a cluster. You typically use one or more nodes when you submit or run a job on Compute Canada. You can specify how many CPUs and GPUs your job needs to access, and for how long, on each node.
- Shell / Terminal: This refers to the program and interface running on your local computer or the remote node which lets you control the computer using only text-based commands. Using the shell/terminal is fundamental for using Compute Canada as you cannot control the node on Compute Canada using graphical or cursor-based interfaces as you normally would on your personal computer. It is a good idea to get familiar with using the terminal in general, and I hope this tutorial helps you get started on this journey. If you want to learn these skills in more depth, this is a great website which provides tutorials covering things like the shell, command-line environments: https://missing.csail.mit.edu/
3. Setting up your environment
This section is entirely dedicated to setting up your personal computer, and where necessary, the remote computers you use on Compute Canada so that you have as efficient a workflow as possible for developing and deploying your deep learning projects. Compute Canada also has good documentation in the form of a wiki, which you should refer to for further reading. However, many deep learning specific concepts and relevant practices are not covered there.
3.1. Getting a Compute Canada account
Before you begin, you will need to register for a Compute Canada (CC) account, which will allow you to log in to CC clusters. You need to sign up on https://ccdb.computecanada.ca/ , and you will need a supervisor (like your PhD supervisor) to sponsor your application. This process can take 2-5 days so it’s best to do this as soon as possible.
If your supervisor does not have a CC account, they will first need to register using the same website. Once they have been approved you can apply for your own account. You will need to provide your supervisor’s CCDB ID, which is usually in the form abc-123.
Once you have your account, and access to a Unix based terminal (see notes above), you can enter ssh username@cedar.computecanada.ca in your terminal to log into the Compute Canada head node. You will need to enter the password you set up on the CCDB website.
3.2. Your Operating System
Which OS you use will have an effect on how you access Compute Canada and how you might edit and run your programs locally before deploying them remotely. The good news is that, nowadays, all modern versions of Windows, Mac OSX, and Linux will let you follow the same approach as I use below.
This tutorial will be using Unix-based terminology and commands. Previously, this would have been a problem for Windows users, but with the introduction of the Windows Subsystem for Linux (WSL) it is possible to use the same commands and programs. If you plan to use Windows 10, I highly recommend that you use WSL which essentially installs Ubuntu on Windows so that you don’t have to change the OS you are working on. I won’t go into the installation details myself, as they are available here already: https://docs.microsoft.com/en-us/windows/wsl/install-win10. It is a pretty simple process.
If you use a Linux OS (such as Ubuntu) or Mac OS, then you do not have to do anything additional at this stage. Please double-check that you can access a terminal and use commands like ssh, cd, and mkdir natively on your OS. If you do not know how on your OS, please follow these instructions for Ubuntu and Mac.
If you use Windows 8 or older, or cannot get WSL to work on Windows 10, I strongly recommend installing Ubuntu on the same hard drive so you can dual-boot between Windows and Ubuntu. If you follow this route, use Ubuntu for all your deep learning and Compute Canada projects.
3.3. Using git for Version Control
Knowing how to use git is an essential skill in software development and engineering. It also makes using Compute Canada extremely easy as you can sync changes in your code with just one or two commands. Most users will already have a GitHub or GitLab account, which allow you to upload your code files to online, private repositories. Below, I will explain how to link these accounts with your personal machine and Compute Canada so you can access your code without needing to log-in to GitHub or GitLab every time.
I personally use Git Lab for my projects but within the scope of this tutorial Git Hub serves the same purpose.
To check if git is installed, run git --version in your command line and you should see something like this:

If you have not used git before, or have forgotten how to use it, now is the time to learn the basic commands such as:
git init- This will create a git repository in your current folder so all files and folders can be synced and version controlled if needed.git clone- This will download the remote repository for the first time so you have a local copy of the repository to work on.git pull- This will download and sync any changes from the remote GitHub/Lab repository so that your local repository is up-to-date.git add- Tell git to track certain (or all) files in the. Any changes to these files will be synced by git when you use thecommitandpushcommands.git commit- This tells git to commit any changes made to tracked files. Committed files will be pushed to the remote repository when usingpushgit push- This will ‘push’ committed files to the remote repository.git diff- A very helpful command which will illustrate which files and which lines have been changed since the previously synced changes in the working folder.git status- A brief summary of new files, new changes, staged changes. Good to check before committing or making any new changes.
It is important to note that git is best used for text-based code files (e.g. .py, .txt, .csv, .ipynb) and NOT large binary files (large image or video files). Git cannot track exact changes in the binary files and trying to do so will make git slow and use up excessive storage.
I highly recommend storing all necessary binary files for your project within a single .zip or .tar archive and unzipping when needed. Transferring files should be done using Globus or another file-transfer program (see Transferring files).
3.4. Python necessities
You may already have a Python setup that works for your projects. However, it is important to ensure your Python environment has two key elements, namely pip as the package manager and the use of virtual environments through the virtualenv python package.
Using pip over other package managers, such as conda, is preferable as Compute Canada has many libraries and modules that are pre-installed on its clusters and can be easily loaded into your workflow using pip.
It is also important to use virtual environments both in your local and remote Python environments to better deal with package version conflicts between different projects, and to increase reproducibility when running your code on multiple different machines. This is especially helpful for managing which Python version you are using, and ensuring that any libraries for that Python version are correctly installed.
As an illustration, if you need to use Python 3.7 for your project, these are the steps you would take to ensure that Python, pip and virtualenv, and any associated Python modules and libraries are correctly set up so you can always repeatably run your program both on your local computer and on Compute Canada. The steps are different between your machine and on Compute Canada, so pay attention to both parts equally!
3.4.1. On your local machine:
1. Update everything first:
sudo apt update && sudo apt upgrade -y
2. Install Python 3.7 if you don’t have it already:
sudo apt install python3.7
Check Python 3.7 installed correctly by running python3.7. If successful, a Python command prompt will appear with the exact version listed. Alternatively you can use the command python3 or python if supported. You may be required to install additional libraries but these will be
3. Install virtualenv using pip
pip3 install virtualenv
4. Create a new virtual environment with Python 3.7 set as the default version
virtualenv -p python3.7 py37
Here ‘py37’ is a name which you can choose for your own environment. For the rest of the tutorial I will assume the python virtual environment is called py37
5. Activate your environment (need to do this before installing any packages)
source ~/py37/bin/activate
If you use a different shell, such as fish, you might need to modify this command (for example for fish it would be: source ~/py37/bin/activate.fish)
6. Install packages with pip as needed
After activating the environment, you can use pip as before to install any Python packages. This will ensure that these packages are associated with your Python 3.7 virtual environment, and this will prevent compatibility issues in the future when you are trying to reproduce your virtual environment on Compute Canada.
It is best practice to save a list of the Python packages you are using in a text file by running pip freeze > requirements.txt, or using a specific tool such as pipreqs
3.4.2. On Cedar / Compute Canada
On Cedar, Python and many common Python libraries already come pre-installed. Instead of installing Python from scratch, you will need to activate the appropriate module, create a virtual environment via virtualenv, and install the Python libraries for your project using pip. If you do this correctly, when you need to run your project on CC, all you will need to do is activate your Python environment, pull any changes using git, and run your code. More detailed documentation on Python on Compute Canada is available here
1. Activate the Python module
To make Python 3.7 available to you, you will need to activate the appropriate module(s) when you are logged into Compute Canada. First, log into Cedar using ssh. Then do the following:
module purge
module load python/3.7.9 scipy-stack
This will make Python 3.7.9 available to you as well as commonly needed Python libraries loaded in the ‘scipy-stack’ module, which are listed here.
You can then test the correct version of python is loaded by running python and seeing the version listed.
2. Create a Python virtual environment
Similar to the step on your local machine, to create your virtual environment you have to run:
virtualenv --no-download ~/py37
Where py37 is the name for your environment.
source ~/py37/bin/activate
to activate the environment.
3. Install additional Python packages as necessary
With the virtual environment activated, you can proceed to install any Python packages that you require for your project using pip. However, one important difference is that you should use the --no-index flag when using pip to install the packages so you are installing locally-available packages directly available on Compute Canada. For example:
pip install --no-index torch scikit-learn tqdm
Some Python packages may not be available locally, for which you should use the pip command as you normally would, for example for the Weights & Biases library:
pip install wandb
4. Demo
Here is what it should look like when the above instructions are put together on Compute Canada

3.5. SSH keys
Setting up SSH keys (which stands for the Secure Shell Protocol) will help you make your Compute Canada workflow very fluid as you won’t have to keep entering usernames/passwords to login to CC/GitHub/GitLab each time you need to access repositories and nodes.
There are three different connections for which you need to set up SSH keys:
- Between your local machine and your Compute Canada account
- Between your local machine and GitHub/GitLab
- Between your Compute Canada account and GitHub/GitLab
The steps for the three connections are the largely the same, and here I will outline them for the connection between your local machine and your Compute Canada account.
1. Generate an SSH key on your local machine (you can skip this step if you have previously generated an SSH key)
First, check if you have an existing SSH key on your local machine by running ls ~/.ssh. If you see two files which are named similarly to id_rsa and id_rsa.pub then you don’t need to generate new keys (skip this step).
If you don’t have an existing key, generate one by doing:
ssh-keygen -t rsa -b 4096
Press Enter at the first prompt to use the default location for storing the key Enter a passphrase if you want (this will be the alternate/shorter/easier password you can choose to enter when logging in), but you can also leave this blank, and press Enter Re-enter a passphrase, or leave it blank, and press Enter.
2. Copy your SSH key to your Compute Canada account
Now do:
ssh-copy-id username@cedar.computecanada.ca
Follow the prompts and enter the necessary information.
3. That’s it! Confirm connection
Now you should be able to log in with your SSH key passphrase or without a password if you didn’t set a passphrase!
Check this by running ssh username@cedar.computecanada.ca and you should be able to log into your remote! This is what it should look like:

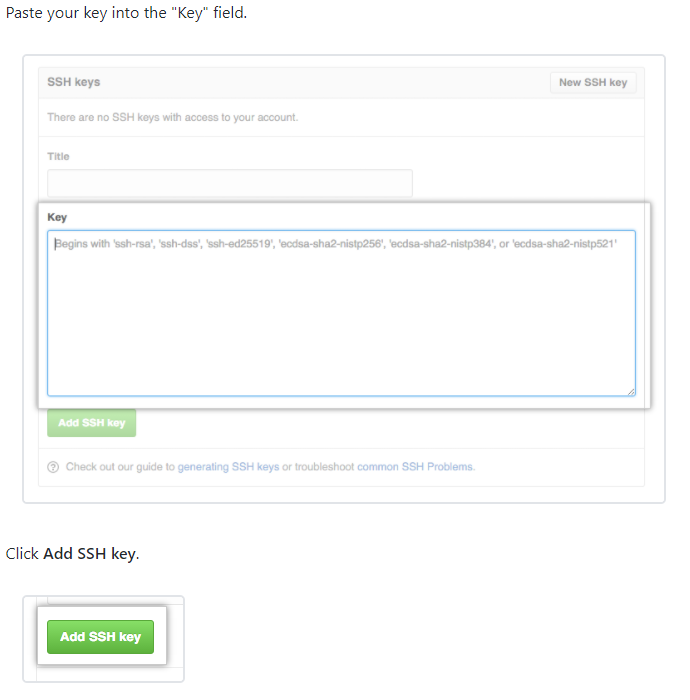
To similarly connect your local machine/CC account with GitHub/GitLab you first need to generate an SSH key on the local or remote CC machine as in the first step above. Then you copy the public SSH key by running cat ~/.ssh/id_rsa.pub and copying the output in the terminal. Paste this public SSH key into your GitHub/GitLab account:
You can confirm that the SSH key is working by running ssh -T git@github.com or ssh -T git@gitlab.example.com for GitHub and GitLab respectively.

Follow these steps for all necessary connections between local/remote/Github and test out the keys are setup correctly.
3.6. Other Software
3.6.1. Visual Studio Code
You will need a good text editor or IDE to edit code frequently on both your local and remote machines. I strongly recommend using Visual Studio Code for this purpose as it can edit code on your machine and also on the remote CC instance. This prevents you using a terminal editor like vim or emacs, which many are not used to. Another benefit of VS Code is that it can run regular Python (.py extension) scripts as notebooks if you include #%% dividers in your code. This is extremely useful for debugging and general data exploration. More information on this functionality can be found here
3.6.2. Weights & Biases (wandb)
As I am sure you know, deep learning jobs can take several hours, days or weeks to finish running. It is important to be able to check their progress and ensure the training is running as intended, and any intermediate results look the way they should. There are several ways of doing this, but by far the most automated and full-featured is using a dedicated program which monitors your training for you and logs any necessary information on the web which you can access from any browser. I have found Weights & Biases (wandb for short) to be the most effective package for this, and it has a completely free version which is enough for most projects. I highly recommend installing this package (via pip) and signing up for an account. Their quickstart page demos functionality and basic setup very well.
4. Transferring files between your PC and Compute Canada
We’re almost ready to start using Compute Canada for some actual… computations! However, before we do that, we will be discussing where you should store your data on Compute Canada and how to transfer data (code and binary files like images/videos) between your local machine and CC so that you can access everything you need for your projects.
4.1. Filesystem on Compute Canada
Compute Canada has multiple different storage options, and it is not immediately obvious where to store your project files, configuration files, and data.
Whenever you log into CC, you will be in your home directory by default (which has the alias ~ and means you can use the ~ symbol to refer to the home directory path). The home directory is a great place to store any configuration files that you won’t be editing frequently - such as your various Python virtual environments or your .bashrc file. Your home directory is not a good place to store your project code or data, as it is relatively slow for read/write operations and you cannot start job scripts from your home directory.
Instead, you should use your Project directory, which will be placed under your supervisor’s directory and look something like: ~/projects/def-supervisor/your-username. This is a good location to store your git repositories, job scripts (described below), and any binary files associated with your project. Because the Project filepath is not necessarily easy to remember, you can define an alias or environment variable as a shortcut to get to it more quickly. To do this, create a .bashrc file in your home directory (if you haven’t already made one before), and add the following line at the end:
export project=~/projects/def-supervisor/your-username
Now whenever you use the variable $project when logged into CC, it will refer to your project directory. So for example cd $project will take you to your project directory. def-supervisor should be replaced by your supervisor’s CC account name - which can be found on the CCDB website.
There is also a ‘scratch’ filesystem on CC, which is meant to be good for fast read/write operations on large files. However, I have not had reliable experiences using the scratch filesystem so I do not recommend using it.
Finally, as we will discuss below, for faster read/write operations, you should consider using the temporary directory on the node that your job is running on. You can access this location using the environment variable $SLURM_TMPDIR. For my jobs, I always first download my project repository to this temporary directory (using git), and extract my datasets to this directory from a pre-defined .tar archive. This is an optional step, and not necessary if you are happy with the speed of your code when it runs on your Project filesystem. More info on the temporary directory can be found here.
4.2. Code
The optimal way to ’transfer’ code such as Python files, Jupyter notebooks, and generally any text-based files, is to use Git Hub/Lab as discussed above. You should commit and push changes from your local machine and then pull them on Compute Canada to ensure you have the latest version of your code (and vice-versa if you are editing on Compute Canada and want your local machine to have the latest version).
When starting a project for the first time on Compute Canada, you should use the git clone command to download the git repository and initialize the git file structure on Compute Canada.
4.3. Large binary files (images, videos, saved models, etc.)
By far the most efficient way to transfer large binary files (such as your training/test image datasets) between your local machine and Compute Canada is to use Globus. Globus is a secure way to transfer files, and is easy to interface with an online interface available at https://globus.computecanada.ca/. Full instructions available here.
To get started with Globus, you first need to install the Globus Connect Personal client for your specific OS, available here. Then create an endpoint on your personal/local machine by doing the following:
- Go to the Compute Canada Globus portal and log in if you have not already done so.
- From the File Manager screen click on the “Endpoints” icon on the left hand side.
- Click on the “Create a personal endpoint” button in the top right corner of the screen
- Enter an “Endpoint Display Name” of your choice, which you will use to access the computer you will be installing Globus Connect Personal on. Example: MacLaptop or WorkPC.
- Click on the download link for your operating system (May need to click on “Show me other supported operating systems if downloading for another computer)
- You should now be able to access the endpoint through Globus. The full endpoint name is [your username]#[name you give setup] Example: smith#WorkPC
To start a transfer, you need to log into the Globus Compute Canada portal, select ‘File Manager’, and then split panes so that you can see two file browsers:
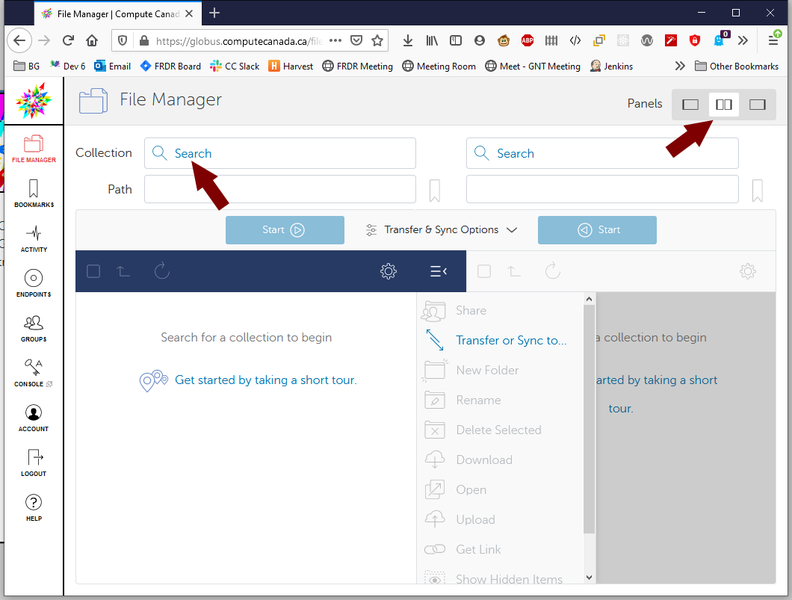
For one of the ‘Collection’ search bars, search for and then select computecanada#cedar-dtn, which should have a green checkmark besides its name. In the other ‘Collection’ search bar, select the personal endpoint you just created (and make sure Globus Connect Personal is running). You will now be able to browse files available to you on Compute Canada and your own local files. You can start a transfer by selecting the relevant file(s) and then selecting the appropriate ‘Start’ button depending on if you are transferring to or from Compute Canada. This will start the transfer process, and you will receive an email when your files have been transferred successfully.
5. Submitting Jobs on Compute Canada
Congratulations, we are now finally ready to use Compute Canada’s full potential! We will be putting everything together from the above setup instructions, and hopefully this will let you have a smooth experience and really understand what is happening when you use Compute Canada.
As described at the very beginning, Cedar is a cluster, which is a collection of nodes (computers) which are connected to each other. When you log into Cedar, you are logging into a ‘head’ node or a ’log-in’ node. This node itself does not have the resources (memory, CPU, GPU) to run computations that are even a little demanding. It is not appropriate to run any computations on the log-in node, and this is actively discouraged. If you are caught abusing this rule, your account can be suspended.
There are several hundreds of nodes on which you are allowed to run jobs, however to do this you need to submit your program/script as a ‘job’. In addition to providing the command necessary to run your job (e.g. python training-script.py), you also need to provide details of what types of resources you need to use and for how long, so the scheduling system on Cedar can appropriately allocate resources for your script.
The sections below will describe how to submit these jobs for a variety of different use cases.
5.1. Environment Variables to Save Time
Normally, whenever you submit a job you need to declare which supervisor’s account your job should run under. Compute Canada needs to know this so it can allocate resources in a fair manner across and within supervisor’s groups. Most of us only have access to resources under one supervisor, so to save time we can define the supervisor’s account once. In your .bashrc file, include the following lines:
export SLURM_ACCOUNT=def-supervisor
export SBATCH_ACCOUNT=$SLURM_ACCOUNT
export SALLOC_ACCOUNT=$SLURM_ACCOUNT
def-supervisor should be replaced by your supervisor’s CC account name - which can be found on the CCDB website.
5.2. Batch job scripts
In the most simple case, we would want to run a training job which is defined in a single Python script, and we do not need to use any GPUs. This could be some machine learning training on non-image or non-video datasets, or some other type of script that only requires CPU access and no GPUs.
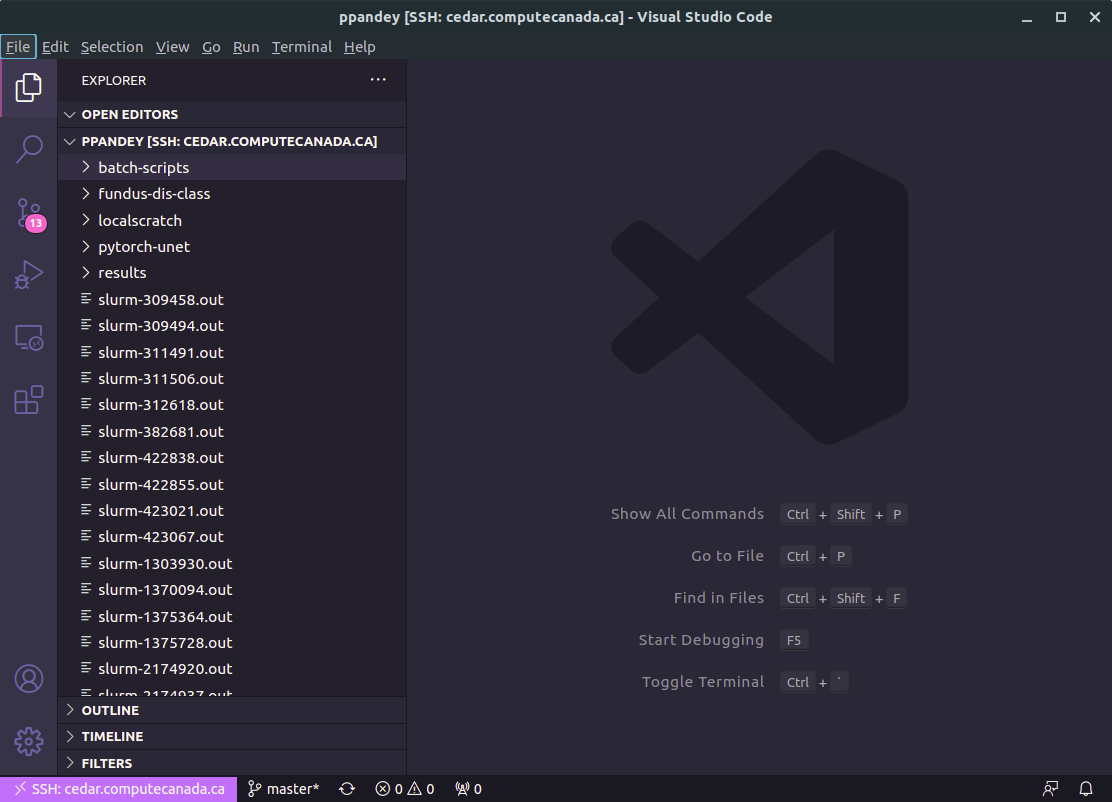
To go about this, we first need to write a job script. A job script file is written in bash and has a .sh extension. You can create and write these files directly from the terminal, but it is easier to this instead in Visual Studio Code by using Code’s remote editing capabilities. Configure Code to access your Compute Canada filesystem by starting Code, and then pressing Ctrl+Shift+P (or the equivalent), typing in ‘Remote-SSH: Add New Host’, pressing enter, followed by ssh username@cedar.computecanada.ca. If you have set up SSH keys, as described above, you can connect automatically. Otherwise, you will need to enter your CC account password first. Once connected, you will see your CC filesystem and files on the left-side pane in Code:
In Code’s file explorer, navigate to your Project directory, create a new folder called ‘job-scripts’ or similar, and then start a new file called simple-job.sh
The first few lines of your job script will define that the script is written in bash, and what resources you need for your Compute Canada job. Here is one example from my script:
#!/bin/bash
#SBATCH --mem=32G
#SBATCH --nodes=1
#SBATCH --ntasks-per-node=8
#SBATCH --time=15:0:0
#SBATCH --mail-user=<youremail@gmail.com>
#SBATCH --mail-type=ALL
These first few lines define 32 GB of RAM, one Compute Canada node, 8 CPU cores for the node (--ntasks-per-node), as well as 15 hours of computation time. Finally, by inputting your email you will also receive notifications for when this job starts, ends, is canceled, or fails. You can see additional definitions and formats for resource requirements on this page - for example how to access more nodes, CPUs, or memory
After this section, you should include where the job will run and what environment it will use. For example:
cd ~/$projects/your-project
module purge
module load python/3.7.9 scipy-stack
source ~/py37/bin/activate
The first line is changing the directory to wherever your code repository is stored, it will be different for you. You will also only be able to use the variable $projects if you had set up previously following the instructions above. You should recognize the last three lines from the above Python setup. Here you are simply activating the appropriate python environment which contains all your necessary.
Finally, you will run your program, which might look like:
python myScript.py
If you don’t yet have a Python script ready to test, just create a short ‘Hello World’ Python script that imports a library from your virtual environment and then print('Hello world!').
Altogether, your simple-job.sh file should contain:
#!/bin/bash
#SBATCH --mem=32G
#SBATCH --nodes=1
#SBATCH --ntasks-per-node=8
#SBATCH --time=15:0:0
#SBATCH --mail-user=<youremail@gmail.com>
#SBATCH --mail-type=ALL

cd ~/$projects/your-project
module purge
module load python/3.7.9 scipy-stack
source ~/py37/bin/activate

python myScript.py
Save the file in Visual Studio Code. Now go to your terminal, log into CC if not already logged in, and run:
cd $project
sbatch job-scripts/simple-job.sh
That’s it! You just submitted a job on Compute Canada. sbatch is the key command to submit your job script files. You can see the status of your job script by using the command sq in the terminal, which will tell you if your job has started and how much time is left.
5.2.1. Accessing GPUs
If you are doing deep learning, there is a good chance you need GPUs to speed up your training program. Accessing one or more GPUs on Compute Canada is surprisingly simple! On Cedar on Compute Canada, you need to include one of the following lines in your job script to define which and how many GPUs you need (make sure to include these lines with the other #SBATCH commands as above):
#SBATCH --gres=gpu:p100:1
#SBATCH --gres=gpu:p100l:1
#SBATCH --gres=gpu:v100l:1
These give you access to either 1 P100, P100l, or V100l GPUs respectively. You can request more GPUs by changing 1 to any other number. This same information is summarized here.
Please keep in mind that accessing more resources (whether GPUs, memory, or CPU) can affect how quickly your job is allocated, so estimate your requirements as accurately as possible. You must also remember that just because you request multiple GPUs does not mean your program will be any faster, unless you have specifically programmed your script to utilize multiple GPUs when present. This will depend on which deep learning framework you are using, for instance PyTorch has its own guidelines for multiple GPU usage.
5.2.2. Tip: Using the Temporary Filesystem for Faster Jobs
Whether or not you are using a GPU, you can increase your program’s speed by making use of the temporary filesystem on the node your job runs on, which you can access with the environment variable $SLURM_TMPDIR. Because this is a temporary space, no files are stored here before your job starts and after your job starts, so it is key to move/reproduce your project files there before running your script, and then move any resulting data back to your Project space after your script runs but before the job ends. I will assume that you use git to reproduce your code/text files, and that your binary data is archived in a tar file in your project folder. Using the same simple-job.sh script as an example above, you should include the following lines after your $SBATCH commands and before your Python script is called:
cd $SLURM_TMPDIR
git clone git@gitlab.com:gitlab-username/project-repo.git
cd ./project-repo
mkdir -p data/output
tar -xf $project/project-repo/data/image-data.tar -C ./data/
module purge
module load python/3.7.9 scipy-stack
source ~/py37/bin/activate
And then after your python myScript.py call you can archive any output data and move it to your Project folder:
tar -cf $project/project-repo/data/results/result-archive.tar data/output/results.pt results.csv
Above I am taking the two pretend files output by my code, results.pt and results.csv and archiving them into a tar file which will be stored in my Projects filesystem under my project repository.
5.3. Interactive jobs
At times, you may want to run your Python script in an interactive session so that you can directly debug your program in Compute Canada. In general, this is not preferred over using a job script as your program should be in a ‘ready-to-run’ state by the time you want to deploy it on Compute Canada and any development/debugging should be completed on your local machine. However, here is how to do it anyway!
Interactive jobs are started using the salloc command, as opposed to the sbatch command which is used for submitting non-interactive jobs. The salloc command should be followed by arguments specifying which compute resources you need, just as in a job script. For instance to request 2 CPU cores for 1 hour:
salloc --time=1:0:0 --ntasks=2
Or 1x P100 GPU, 16 Gb of memory, and 8 CPU cores on 1 node for 30 minutes:
salloc --time=0:30:0 --ntasks=8 --gres=gpu:p100:1 --mem=16G --nodes=1
You will have to wait for an allocation to begin before you can use the interactive node. Here is a demo showing the access of an interactive node with a GPU, combined with the nvidia-smi command to verify the GPU properties:

5.3.1. Using Jupyter on Compute Canada
One of the biggest reasons for using interactive jobs is for running your Python program as a Jupyter notebook so you more easily do the development/debugging cycle. As stated above, it is better to do this on your local machine, however it can be done on Cedar too.
1. Install Jupyter on Compute Canada
With your Python virtual environment activated, the correct Python module loaded on Compute Canada, install jupyter if you haven’t already, via:
pip install jupyterlab
2. Create a wrapper script to launch Jupyter notebooks or lab:
echo -e '#!/bin/bash\nunset XDG_RUNTIME_DIR\njupyter notebook --ip $(hostname -f) --no-browser' > $VIRTUAL_ENV/bin/notebook.sh
chmod u+x $VIRTUAL_ENV/bin/notebook.sh

echo -e '#!/bin/bash\nunset XDG_RUNTIME_DIR\njupyter lab --ip $(hostname -f) --no-browser' > $VIRTUAL_ENV/bin/lab.sh
chmod u+x $VIRTUAL_ENV/bin/lab.sh
Now you have Jupyter configured on your Compute Canada environment.
3. Submit an interactive job with the resources you need
For instance:
salloc --time=0:30:00 --nodes=1 --mem=4G --ntasks=2
4. On interactive node activate the Python module and your virtual environment
module purge
module load python/3.7.9 scipy-stack
source ~/py37/bin/activate
5. Run the notebook.sh OR lab.sh script depending on whether you want to start a notebook or JupyterLab
$VIRTUAL_ENV/bin/notebook.sh
After running this, you will see Jupyter printing URL in the terminal which will look something like:
http://cdr544.int.cedar.computecanada.ca:8888/?token=7ed7059fad64446f837567e3
      └────────────────┬───────────────────┘        └──────────┬───────────┘
                  hostname:port                               token
6. Create an SSH tunnel from your local machine to the interactive node
On your local machine terminal, run:
ssh -L 8888:<hostname:port> your-username@cedar.computecanada.ca
Where hostname:port is from the URL above. Once connected you can now go to your web browser on your local machine and navigate to:
localhost:8888/?token=<token>
Where <token> is from the URL above in step 5.
That’s it! You should see the Jupyter notebook or lab interface in your browser.
5.4. Best Practices
There is not much more to add here, but keep in mind that using git, SSH keys, Visual Studio Code’s remote editing, and Weights & Biases should give you a very pleasant and productive experience using Compute Canada. You should be able to simple develop your code on your local machine, deploy it on Compute Canada, and then monitor its progress without having many hurdles at all (other than the ones arising from your deep learning program ;)!
You may think some of the steps I mentioned in the setup are optional and not worth it, but if you find yourself getting frustrated at how challenging it is using Compute Canada - then you should really follow each step of the tutorial closely before trying anything else.
5.4.1. Additional tips:
-
Read about how to use a terminal multiplexer such as
tmux, which is pre-installed on Compute Canada. This will let you split your terminal into multiple panes so you can multi-task without having to log in multiple times into Compute Canada. Here is a quick demo (as of Jul 9 2021, this animation is best viewed in Firefox instead of Chrome) -
Use
Ctrl+r(reverse-i-search) to search your terminal command history so you don’t have to write long commands out every time. For example if you want to find the lastsalloccommand you used, first pressCtrl+rand then start typingsalloc. This will show you the lastsalloccommand you used. If you want to cycle through the othersalloccommands in your history, keep pressingCtrl+r:
6. Monitoring your Learning Scripts
6.1. Basic monitoring with built-in Compute Canada Commands
The most basic way to monitor your jobs is to use the sq command. This will tell you whether your CC job has started or is queued, as well as how much time is left if it has started. However, you will get no more information so it is not the most useful command for things like debugging your code.
Once your job is running, it will output a log of everything that is printed to the terminal into a file which will have the name slurm-<job-id>.out where <job-id> is the ID of your job given by the scheduler. Therefore, you can read the log by opening it in Visual Studio Code if you are connected to CC in Code. You can also use the commands cat, tail or head to directly see the log output in your terminal:
cat slurm-xxxxx.out                     #print the entire log
head -n 50 slurm-xxxxxx.out             #print the first 50 lines of the log
tail -n 50 slurm-xxxxxx.out             #print the last 50 lines of the log
watch -n 10 tail -n 10 slurm-xxxxxx.out #Every 10 seconds print the last 10 lines of the log
You can combine one of the above commands with a pipe and the grep command to find certain phrases or string patterns to help with debugging, for example:
cat slurm-xxxxxx.out | grep 'error'
6.2. Deep Learning Monitoring using Weights & Biases
As mentioned earlier, the Python package wandb (Weights & Biases) can make it very easy to monitor your deep learning scripts, or in general any Python program. The official documentation is available here, and here are few helpful tips from my experience:
-
You can have multiple ‘projects’ in W&B, and you can specify which project you want your training to sync to by specifying at the top of your training script
wandb.init(project="my-project") -
You can provide your username and API key in your training script directly to authenticate W&B access, so you don’t have to log in each time you access a new environment:
os.environ['WANDB_API_KEY']='your-API-key'
os.environ['WANDB_ENTITY']='your-wandb-username'
-
Use W&B sweeps functionality together with Python command line arguments to optimize your deep learning hyperparameters. For this you will need the
argparsePython library. -
Name your W&B runs descriptively so you can find them easily and infer the key differences between runs (for example, include the dataset, learning rate, batch size, etc in the run name). The run name is set in the init() function, eg:
wandb.init(project="unet-us-datasets", resume="allow", name=args.output_fname)
- Make heavy use of
wandb.logto log anything that you want to observe in your program, including scalars, arrays, images:
wandb.log({
            "Epochs": epoch + (i_batch / len(train_dataset_loader)),
            "Training Loss": loss.item(),
            "Training Images": [wandb.Image(grid_img)], # Image stored as numpy array
            "Training Dice": np.mean(np.asarray(train_dice_score)),
            "Training Coverage": np.mean(np.asarray(train_coverage)),
            "Training RMS Dist": np.mean(np.asarray(train_rms_dist)),
            "Training Coverage Dist Idx": np.mean(np.asarray(train_CDI)),
            "Alpha": alpha,
            "Learning Rate": learning_rate,
            "Training pred": [wandb.Image(pred_skel)],
            "Training ref": [wandb.Image(ref_skel)],
            "Training SSIM": np.mean(np.asarray(train_ssim))
              })
You can log different things at different times in your training process by calling the wandb.log() command every iteration, and/or every epoch, and/or once at the end of your script.
- The W&B community is very helpful at answering questions and sharing tips. If you are stuck, check out there Git Hub page or the forum
7. Putting it Together - Video Demos
The two videos below demonstrate a couple of use cases for running deep learning jobs on Compute Canada, making use of the set up and instructions above. Watch these videos after reading and following all the steps above. If you want to follow along, the sample code in these videos can be found on this Git Lab repository.